7 January 2014
4 Ways to Transform Your Office Into A Video Studio

by Ryan Finke
Video is Important and Anyone Can Do It
You don’t have to be a professional videographer to make creative videos for your business. Nor do you need namebrand expensive equipment in order to make a video that pops. With a few commonly found and affordable items (and a bit of creative planning) you can set up a video studio in your own office.
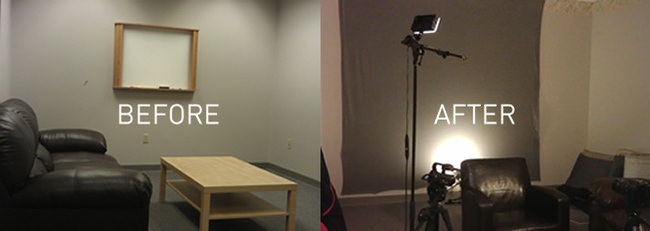
Set Up the Room
Let’s be honest, a typical meeting room looks pretty drab: plain white walls, dry erase boards, and black swivel chairs around a table. However, it’s not hopeless.
First, choose a room without windows or cover them up. You’re going to want to be able to keep your lighting consistent, and the sun shining through the window doesn’t help. Also, make sure the room isn’t too small. You’re going to want enough room to easily adjust the position of your lights, mic, camera and other props.
Next, cover up one of those white walls. You can buy a roll of colored paper from an art store, or just hang up a solid colored bedsheet from home. Pull it taut using clothes pins and thumb tacks. This will give your video a different environment than a sterile meeting room. Just make sure the back drop and your subject’s clothing aren’t the same color.
Let Lighting Make You Look Awesome
The big game changer from amateur to professional video lies in good lighting. Luckily, you don’t have to spend gobs of money to get that look anymore.
What you’ll want are 3 lights. Grab clip lights from your local hardware store or on Amazon (about $11 each), and screw in some daylight CFLs (sometimes your energy provider will even give you some for free!) Buy a small roll of tracing paper and use wooden clothes pins to hang it in front of your lights. This will create a softer light which makes people look better on camera.
Next, clip 2 of your lights to mic stands (or a study standing lamp) at 45 degrees on both sides of your subject. Think of it as a triangle, with your subject as the top point and your lights as the bottom corners. Make sure the lights are slightly above your subject in order to create a slimming effect (the camera may “add 10 lbs” but good lighting takes even more away).
Place your last light behind your subject and point it upwards at the back wall. This will create visual separation between your subject and the background, making your video look even more professional.
Capture Audio the Right Way
A common audio problem with meeting rooms is they echo badly. To combat this, bring couches into the room or hang blankets on the walls to absorb sound and keep sound waves from bouncing.
You will also need an external mic to catch quality sound. Don’t use your camera’s mic for this. Whether you buy or borrow one, use either a lapel mic that you can clip onto your subject’s shirt, or a shotgun mic which you will need to point directly at your subject’s mouth. These types of microphones are non-intrusive in your video and also avoid picking up unwanted sounds.
Present Yourself Professionally
Let’s face it. You just set up your meeting room into a DIY video studio and saved a bunch of money. Things may look a little makeshift, and that’s OK. You’ll just need to help whoever you’re filming feel comfortable in your studio too.
Whether you’re filming an interview or a rehearsed message, you’ll want to acclimate your subject to the scene. Invite them in and take a little time to explain how you’ve set up the room. Don’t bore them with details, but help them understand the purpose of the lights, mic and camera around them.
Provide a bottle of water in case they get a dry throat. Turn your camera on before you actually start your interview to reduce stage fright. Start small talk with your subject to help them loosen up, and then transition smoothly into your interview.
If you want to learn more about planning for a video, read my previous article, Storytelling Through Video.
So What About A Camera?
Yes, you will need a camera. Like microphones, these are often difficult to find a professional quality replacement for, so borrow one if you can or try to find a good deal. Depending on whether you want to zoom in/out, change the depth of field, or shoot in HD will determine your personal choices on which camera and lens to use.
Alright, that’s enough information to get in trouble. Have fun!
For even more information, I would recommend checking out Wystia’s video tutorials on shooting your own videos.
Also, check out a video shoot in our own Gaslight office!