11 December 2024
Self Hosted Metabase on Fly.io with Postgres Database
Build a self hosted Metabase instance on Fly.io with Postgres
In this tutorial, we’ll guide you through the process of deploying a self-hosted Metabase instance along with a Postgres database on Fly.io. Self-hosting Metabase is an excellent way to start using this powerful data analysis tool inexpensively, allowing you to gain valuable insights from your data without breaking the bank. Launch Scout has been building these solutions and delighting clients with its easy and low point of entry, ensuring a smooth onboarding experience.
We’ll leverage Fly.io, a developer-friendly platform that offers a robust, command-line interface (CLI) tool for efficient deployment and management. By following these steps, you’ll set up a cost-effective, scalable solution for data analysis that you can fully control. Whether you’re a small startup or an individual developer, this setup will empower you to make data-driven decisions while maintaining flexibility and keeping costs in check.
Setup a Fly.io account
- Head over to Fly.io and create an account. You will need to provide a credit card for hosting, but any billing under $5 is free.
- Install the Fly CLI via Homebrew
brew install flyctrl(brew is a Mac package manager) - Authenticate with Fly.io using
fly auth login
Deploy Postgres on Fly.io
We have a Fly account and are logged in. Let’s start building.
- Create a new Postgres app
fly postgres create - Choose the appropriate options
- Select the name for your Postgres instance
- Choose your region
- Select configuration (for this tutorial
Development - Single node) - Decide on high availability options (we chose to scale down after one hour to save money)
Fly will provision the database and provide you with credentials at the command line. Be sure to copy your credentials, you will need these later for connecting to the newly hosted database
Postgres cluster blog-metabase-db created

  Username:    postgres
  Password:    database-password
  Hostname:    blog-metabase-db.internal
  Flycast:     xxxx:1:x11:1:1::11
  Proxy port:  5432
  Postgres port:  5433
  Connection string: postgres://postgres:database-password@blog-metabase-db.flycast:5432

Save your credentials in a secure place -- you won't be able to see them again!
Prepare the Metabase Deployment
We have our Postgres instance hosted and the information we need to connect to it. We will need a Dockerfile for the Metabase app. Lets create one.
-
Create a directory on your machine for the files your app will require
- Create a
Dockerfilefor Metabasetouch Dockerfileand paste the following into the file:FROM metabase/metabase:latest - Create a
fly.tomlfiletouch fly.tomlfor the Metabase configurationapp = "your-metabase-app-name" [env] [[services]] internal_port = 3000 protocol = "tcp" [[services.ports]] handlers = ["http"] port = "80" [[services.ports]] handlers = ["tls", "http"] port = "443"
Deploy Metabase on Fly.io
Now it’s time to deploy Metabase to Fly.io using the Dockerfile file we created. Again Fly gives us what we need via their CLI tool.
- Initialize the Fly app:
fly launch - Select
Ywhen asked to copy configuration to new app - Select
Yto tweak the settings if you like (this will launch your browser). For instance maybe change the app name. For this tutorial we will useshared-cpu-1xfor CPU and1GBfor memory. All items under “Extensions” will be set tononeordisabled. Press “Confirm Settings”
Fly with automatically deploy the app and show you a web address where the app is hosted. Don’t go there quite yet, it won’t work until we tell Metabase how to connect to the Postgres Database.
Update the Metabase blog secrets
Back when we deployed Postgres to Fly we received some secrets. Let’s provide those secrets to the running metabase instance.
- In your terminal, add the following data (updated with the actual secrets)
fly secrets set MB_DB_USER="postgres" \ MB_DB_PASS="database-password" \ MB_DB_HOST="blog-metabase-db.internal" \ MB_DB_DBNAME="postgres" \ MB_DB_TYPE="postgres" \ MB_DB_PORT="5432" - Fly will automatically deploy these secrets to the database
Now you can visit the site Fly.io has created for you. Something like https://your-hosted-app.fly.dev/
Complete the hosted Metabase setup
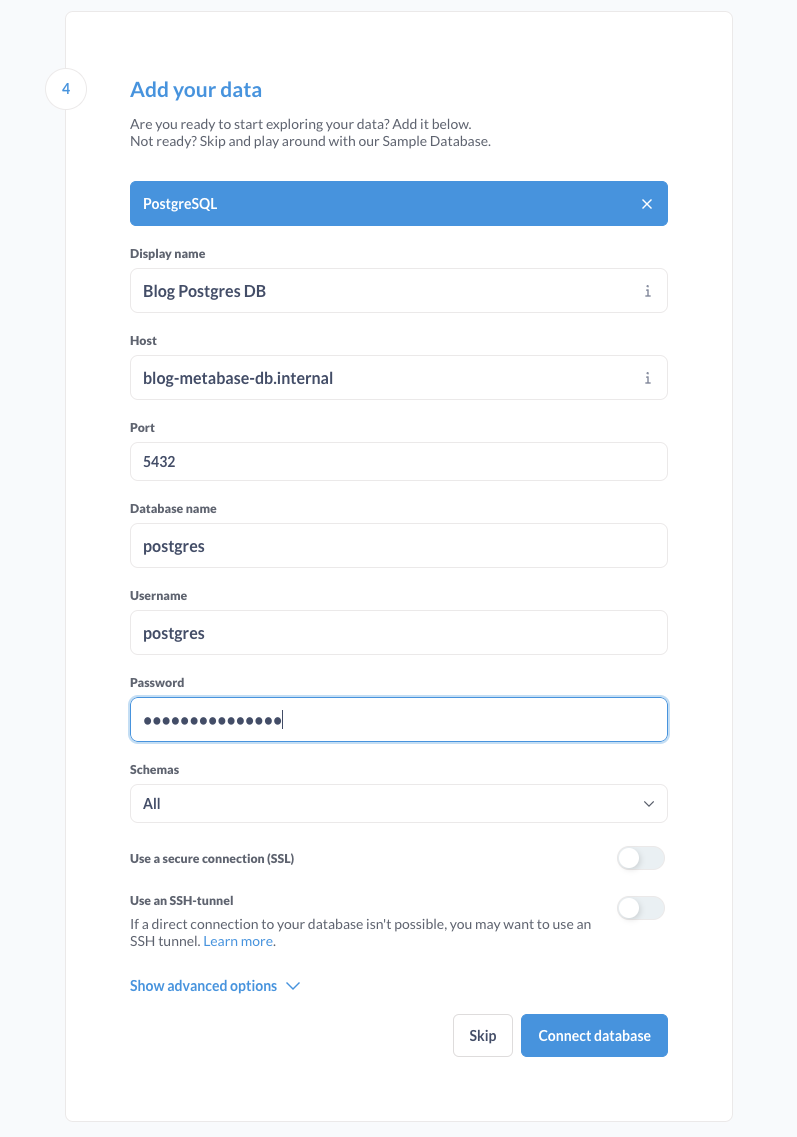
You will be asked to provide an email, organization, and a password. After setting those up, you will be asked for details to connect to your database.
Here, we will use the same data that was provided to us when the database was created.

Once you are connected, you can start to play with the example data that Metabase provides or start to populate the database with your own data to explore.


